Imagine harnessing the sun’s rays to whip up a feast without a hint of smoke or a whiff of gas. That’s solar cooking for you – a technique as old as time, now with a modern twist. It’s about cooking smarter, not harder, and doing our bit for the planet while we’re at it. So, let’s dive in and master the art of cooking with the ultimate renewable resource – sunlight.
Key Takeaways
- Solar cooking is a sustainable method using the sun’s energy to cook food.
- Choosing the right solar cooker and materials can greatly enhance cooking efficiency.
- Proper positioning of the solar cooker is crucial for maximum solar gain.
- Preheating your solar cooker can significantly reduce cooking time.
- Reflectors and insulation are key to controlling cooking temperatures in solar cookers.
Harnessing the Sun’s Power: Cooking with Solar Efficiency
Now, you might be thinking, “Solar cooking sounds great, but how does it actually work?” It’s simple, really. The sun beams down energy, which we capture and convert into heat to cook our food. No need for electricity or fuel, just good old sunshine. And the best part? It’s free and abundant, at least when the sun is shining.
What Is Solar Cooking?
Solar cooking is all about using the sun’s energy instead of traditional fuel or electricity. By focusing sunlight onto a cooking vessel, we can bake, boil, or steam our way to a delicious meal. It’s not just a novelty; it’s a practical, eco-friendly solution for outdoor enthusiasts, eco-warriors, and anyone looking to cut down on utility bills.
The Impact of Solar Cooking on the Environment
By opting for solar cooking, we’re not just saving money; we’re saving the planet. Traditional cooking methods release harmful emissions and contribute to deforestation. Solar cooking, on the other hand, is clean and green. It reduces our carbon footprint and helps us breathe a little easier, knowing we’re part of the solution, not the problem.
Selecting Your Solar Cooking Gear
Before you can start cooking with the sun, you need the right equipment. There’s a range of solar cookers out there, from simple DIY setups to high-tech models. But don’t worry; I’ll walk you through choosing the gear that’ll have you cooking with the power of the sun in no time.
Types of Solar Cookers
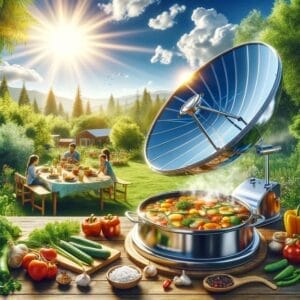
There are three main types of solar cookers – box cookers, parabolic cookers, and panel cookers. Each has its own perks:
- Box Cookers: Great for beginners, they’re like a slow cooker powered by the sun.
- Parabolic Cookers: These are the powerhouses, capable of reaching high temperatures quickly, but they need more attention to safety and positioning.
- Panel Cookers: A blend of the two, offering portability and moderate cooking power.
When choosing, consider what you’ll be cooking and how much time you’re willing to invest. For a slow-cooked stew, a box cooker is perfect. If you’re after a quick stir-fry, reach for a parabolic cooker.
Choosing the Right Materials for Solar Cooking
Materials matter when it comes to solar cooking. You want something that’s going to soak up all that solar goodness and get nice and hot. Dark, matte surfaces are the way to go – they absorb more heat than shiny, light-colored ones. Think of it like wearing a black shirt on a sunny day; you’re going to feel the heat!
Now, let’s get started on the solar cooking journey. It’s all about using what we have – the sun – to its fullest potential. So grab your cooker, find that sunny spot, and let’s turn those rays into a tasty meal!
Positioning for Maximum Solar Gain
Getting your solar cooker to reach the right temperature is all about positioning. You want to catch as much sunlight as possible. To do this, you need to understand where the sun is in the sky at different times of the day and seasons. It’s like finding the sweet spot where the sun’s rays are the strongest.
Understanding the Sun’s Path
The sun moves across the sky from east to west, but its path changes with the seasons. In summer, it’s high overhead, and in winter, it’s lower in the sky. To make the most of the sun’s power, angle your solar cooker so that it faces directly towards the sun. This means adjusting the position throughout the day to follow the sun’s journey across the sky.
Adjusting Your Cooker Angle for Optimal Efficiency
Here’s a hot tip: tilt your cooker so that it’s perpendicular to the sun’s rays. This might mean propping up one side in the morning and the other in the afternoon. It’s a bit like sunbathing – you need to move your sun lounger to catch those rays!
Preheat Your Solar Cooker
Just like you preheat a conventional oven, you should preheat your solar cooker. This gets it up to the right temperature so that when you put your food in, it starts cooking straight away. Think of it as warming up before a workout – it gets everything ready to perform its best.
The Benefits of Preheating
Preheating can cut down your cooking time significantly, especially for foods that need a high temperature to start with. It’s a simple step that can make a big difference. Give it about 30 minutes to an hour, depending on the type of cooker and the intensity of the sun.
How Long to Preheat for Different Cooker Types
For box cookers, aim for about 30 minutes of preheating. Parabolic cookers get hot fast, so they might only need a few minutes. Panel cookers fall somewhere in the middle. Just touch the inside (carefully!) to see if it feels hot to the touch, and you’ll know it’s ready to go. For a more comprehensive understanding, you can refer to The Ultimate Solar Cooker Guide which covers various cooker types and their usage.
Enhancing Cooking Efficiency with Reflectors
Reflectors are like the cheerleaders of solar cooking – they focus even more sunlight onto your cooker. This means faster heating and hotter cooking temperatures. And you don’t need anything fancy; even aluminum foil can do the trick.
Reflector Materials and Placement
When choosing reflector materials, shiny and reflective is the name of the game. Here’s what works well:
- Aluminum foil
- Reflective Mylar
- Polished stainless steel
Place your reflectors on the sides or below the cooking pot, wherever they can catch and bounce sunlight directly into the cooker. It’s a bit like using a mirror to signal someone in the distance – you’re signaling the sun to cook your food.
DIY Reflector Solutions
If you’re the crafty type, you can make your own reflectors. Cut cardboard into the right shape and cover it with aluminum foil, shiny side out. It’s a low-cost way to boost your solar cooker’s performance. Just make sure they’re secure so they don’t blow away in the wind!
Controlling Cooking Temperatures
Controlling the temperature of your solar cooker is crucial for making sure your food cooks just right. No one wants a half-baked potato or a scorched soup. So, let’s talk about how to keep things at the perfect temperature.
Insulation Techniques
Insulation helps keep the heat in, just like a cozy blanket on a cold night. Wrap the sides of your cooker with insulating materials like wool, foam, or even bubble wrap. This will help maintain a steady temperature, especially on those breezy days. For more advanced techniques, consider exploring The Ultimate Guide to Solar Cooking Methods.
Monitoring and Adjusting Solar Cooker Temperatures
Keep an eye on the temperature with a simple oven thermometer. If things are getting too hot, open the lid a crack or adjust the reflectors to reduce the heat. If it’s not hot enough, check your positioning and make sure your reflectors are doing their job.
Timing: When to Cook with Your Solar Cooker
Timing is everything with solar cooking. The sun’s at its strongest from late morning to early afternoon, so that’s prime cooking time. But remember, solar cooking takes a bit longer than traditional cooking, so start early and give your food plenty of time to simmer to perfection.
The Best Times of Day for Solar Cooking
Here’s a quick guide to the best times for solar cooking:
- Morning: The sun’s rays are getting stronger – good for slow-cooked dishes.
- Midday: The sun is at its peak – great for quicker cooking and higher temperatures.
- Afternoon: The sun’s power is waning – better for dishes that just need to stay warm.
Seasonal Considerations in Solar Cooking Efficiency
Solar cooking isn’t just a summer fling; it’s a year-round relationship. But just like any relationship, it has its ups and downs. In winter, the sun is lower and the days are shorter, so you’ll need to be a bit more strategic about when and how you cook. But with a little planning, you can enjoy solar-cooked meals even on the chilliest days.
Cookware Recommendations for Solar Cooking
The right cookware can make a big difference in how well your solar cooker performs. Here’s what to look for:
Best Materials for Heat Absorption
Go for pots and pans that are dark-colored and made of materials that conduct heat well, like cast iron or aluminum. They’ll absorb heat quickly and cook your food evenly. Avoid shiny or light-colored cookware – they’ll reflect the heat away instead of soaking it up.
Optimal Cookware Sizes for Solar Cooking
Size matters, too. You want cookware that fits well inside your cooker, with enough room for the air to circulate but not so much that you lose heat. A snug fit is what you’re after.
For example, if you’re using a box cooker, a round or oval pot will allow for better air circulation and more even cooking than a square one. It’s a small detail, but it can have a big impact on your cooking results.
And that’s it for now! With these tips, you’re well on your way to becoming a solar cooking pro. Stay tuned for more advanced techniques and maintenance tips to keep your solar cooking game strong.
Stack Cooking: Maximizing Space and Time
Let’s talk about stack cooking. This nifty technique allows you to cook multiple dishes at once by stacking them inside the cooker. It’s like having an oven with multiple racks, but it’s powered by the sun. Use stackable pots, or place a wire rack inside your cooker to create layers. This way, you can cook your main dish on the bottom and a side dish or dessert on top. It’s a real game-changer for making the most of your cooking time and solar energy.
Solar Cooking While On The Move
Solar cooking isn’t just for your backyard; you can take it on the road, too. Portable solar cookers are perfect for camping trips or picnics. They fold down flat and can be set up in minutes. Just because you’re away from home doesn’t mean you can’t enjoy a hot, home-cooked meal. With a little bit of sunlight, you can cook anywhere under the open sky.
And here’s a tip: If you’re moving around a lot, go for a panel cooker. They’re lightweight and easy to reposition as you follow the sun. It’s like having a portable kitchen that’s always ready to go.
Maintaining Your Solar Cooking Equipment
Maintenance is key to keeping your solar cooker in top shape. You’ve invested in this eco-friendly technology, so let’s make sure it lasts. Regular cleaning and maintenance not only prolong the life of your cooker but also ensure that it operates at peak efficiency every time you use it.
Cleaning and Storage Tips
After each use, give your solar cooker a good wipe down to remove any food residue or grease. Use a gentle, non-abrasive cleaner to protect the surfaces. When you’re not using your cooker, store it in a dry place away from direct sunlight to prevent wear and tear from UV exposure. This way, it’ll be clean and ready to go for your next solar cooking adventure.
For the reflective surfaces, a bit of vinegar and water will keep them shining and efficient. Remember, the cleaner your cooker, the better it will perform.
And don’t forget about your cookware. Use pots and pans that are easy to clean and won’t scratch the interior of your cooker. Keeping everything in tip-top condition means you’re always ready for a solar-powered feast.
- Wipe down solar cooker after each use.
- Store in a dry place away from direct sunlight.
- Clean reflective surfaces with vinegar and water.
- Use easy-to-clean cookware that won’t damage the cooker.
Regular Maintenance Checks
Set a schedule for deeper maintenance checks. Once a month, inspect your cooker for any wear or damage. Check the seals, the glass or plastic cover, and the reflectors. Make sure everything is intact and functioning properly. If you spot any issues, address them promptly to avoid compromising the cooker’s efficiency.
Also, keep an eye on the nuts and bolts. Tighten anything that’s come loose to ensure your cooker is sturdy and safe to use. A well-maintained solar cooker is a reliable tool in your sustainable living arsenal.
The Art of Solar Cuisine: Tips and Tricks
Solar cooking is more than just a technique; it’s an art form. And like any art, it takes practice and a few insider tips to perfect. Let’s look at some ways to elevate your solar cuisine to the next level.
Adapting Recipes for Solar Cooking
Most recipes can be adapted for solar cooking with a few tweaks. Since solar cookers often cook at lower temperatures, you might need to increase the cooking time. But patience is a virtue, and the wait is worth it for that sun-kissed flavor.
Also, think about the liquid content of your dishes. Solar cookers seal in moisture, so you might need less liquid than usual. This means your food won’t dry out, and flavors will be more concentrated. It’s a whole new way to savor your favorite recipes.
Common Challenges and Solutions in Solar Cooking
Solar cooking is a breeze once you get the hang of it, but you might face a few challenges along the way. Cloudy days can slow down the cooking process, so always have a backup plan. And if the wind’s picking up, shield your cooker with a windbreak to maintain temperature.
If you’re struggling to reach the right temperature, check your reflectors and make sure they’re clean and properly angled. A little adjustment can make a big difference in harnessing the sun’s power.
Frequently Asked Questions (FAQ)
Now, I know you’ve got questions, and I’ve got answers. Let’s tackle some common queries about solar cooking.
How Does Weather Affect Solar Cooking?
Weather plays a big role in solar cooking. Sunny days are ideal, but even on partly cloudy days, you can still cook effectively. If it’s overcast, you’ll need more time, and some dishes may not be feasible. Always check the forecast before you plan your solar-cooked meal.
And remember, even in less-than-ideal conditions, your solar cooker is still working for you. It’s all about adapting to what Mother Nature has in store.
Can I Solar Cook during Winter?
Yes, you can solar cook during winter! The key is to capture as much sunlight as possible. Use reflectors to concentrate the weaker winter sun, and make sure your cooker is well insulated. You might need to cook during the sunniest part of the day and choose dishes that don’t require high temperatures. But with a little creativity, you can enjoy solar cooking year-round.
What Foods Are Best Suited for Solar Cooking?
Slow-cooked stews, soups, and casseroles are perfect for solar cooking. But don’t stop there – bread, cookies, and even pizza can be cooked in a solar oven. The gentle cooking process is great for delicate flavors and tender meats. Experiment and have fun with it – the sun’s the limit!
How Long Does It Typically Take to Cook a Meal with a Solar Cooker?
Cooking times vary depending on the type of food and the solar cooker used. As a general rule, expect it to take about twice as long as conventional cooking. But this isn’t a race; it’s about enjoying the process and the unique flavors that come from cooking with the sun.
Can Solar Cooking Replace Traditional Cooking Methods?
Solar cooking can definitely complement and in some cases, replace traditional cooking methods. It’s especially useful in off-grid living, camping, or simply reducing your carbon footprint. While it may not be the sole method for everyone, incorporating solar cooking into your routine can lead to a more sustainable and enjoyable way of life.


